Authoring Copilot Tours
Script walk-throughs that replay identically every time — website tours for your visitors and in-app tours for your team — by recording, generating with AI, or editing stops directly.
Open Tours in the Copilot Manager
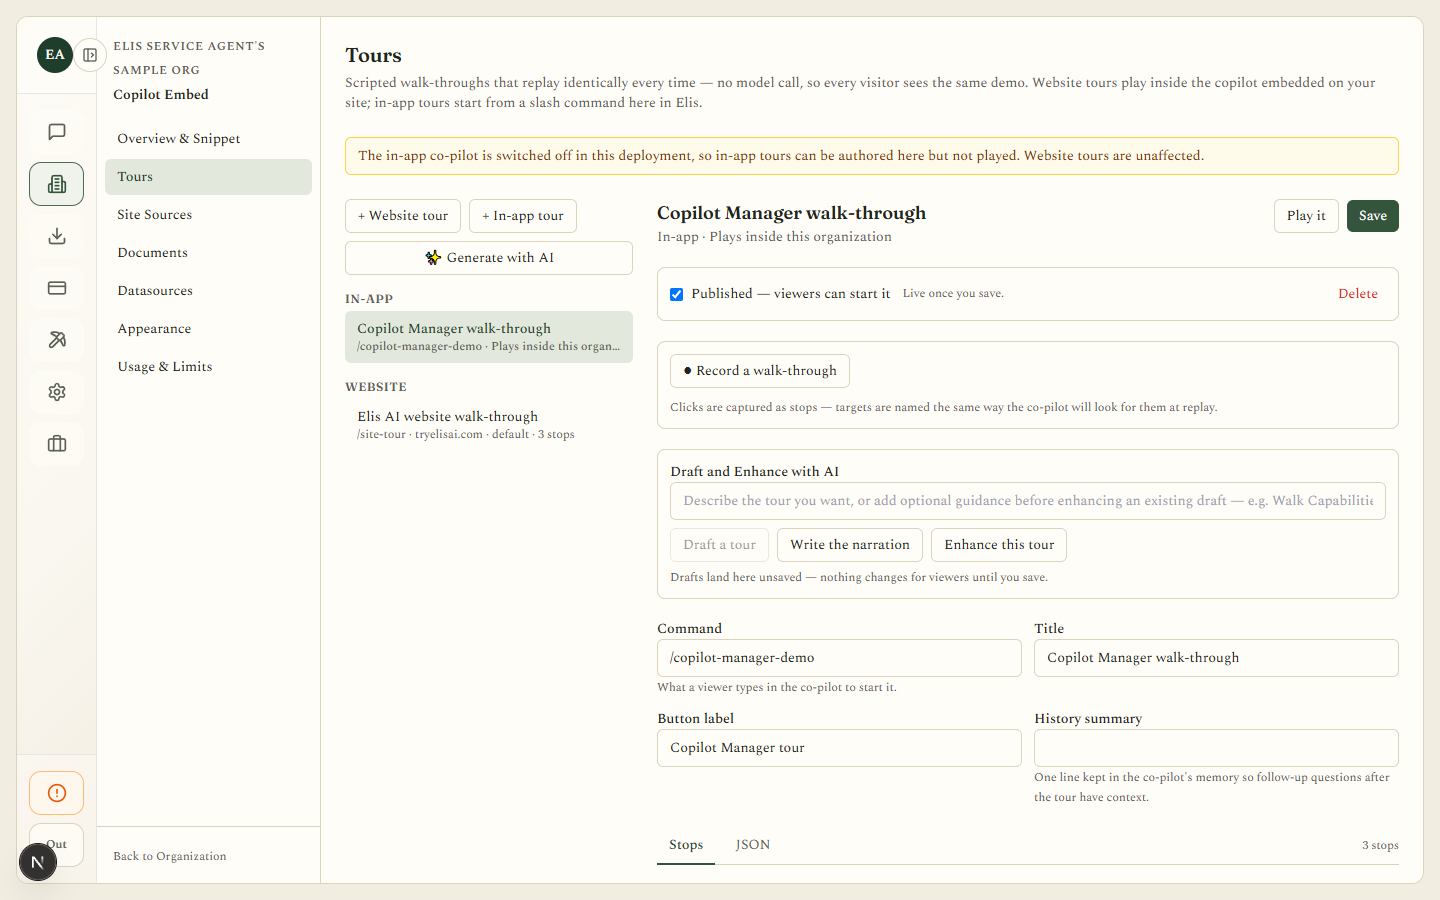
In your organization’s Copilot Manager (/companies/{id}/copilot/tours), click Tours in the sidebar. The page explains what a tour is: “Scripted walk-throughs that replay identically every time — no model call, so every visitor sees the same demo. Website tours play inside the copilot embedded on your site; in-app tours start from a slash command here in Elis.”
There are three kinds of tour:
- Website (embed) tour — lives on one of your site’s embeds and is started by the widget’s Take the tour button. An embed can serve several website tours; one of them is the default that button plays.
- In-app (org) tour — for your own team inside Elis, started with a slash command, with its own draft/published status.
- Platform demo — product demos for every signed-in viewer on the platform, authored at
/system-admin/tours. System admins only; not part of this page.
If the in-app co-pilot is switched off in this deployment, an amber notice says so: “The in-app co-pilot is switched off in this deployment, so in-app tours can be authored here but not played. Website tours are unaffected.”
Before you create anything, the library shows: “No tours yet. Create an in-app tour, or add an embed on Overview & Snippet to author a website tour.”
Create a tour
Click + Website tour or + In-app tour and type the command that starts it (e.g. /acme-demo). A website tour needs an embed to belong to first — without one you’ll see: “Add an assistant for your site first (Overview & Snippet) — a website tour is served by one.”
The editor gives every tour a Command, Title, and Button label. In-app tours get one more field, History summary — one line kept in the co-pilot’s memory so follow-up questions after the tour have context.
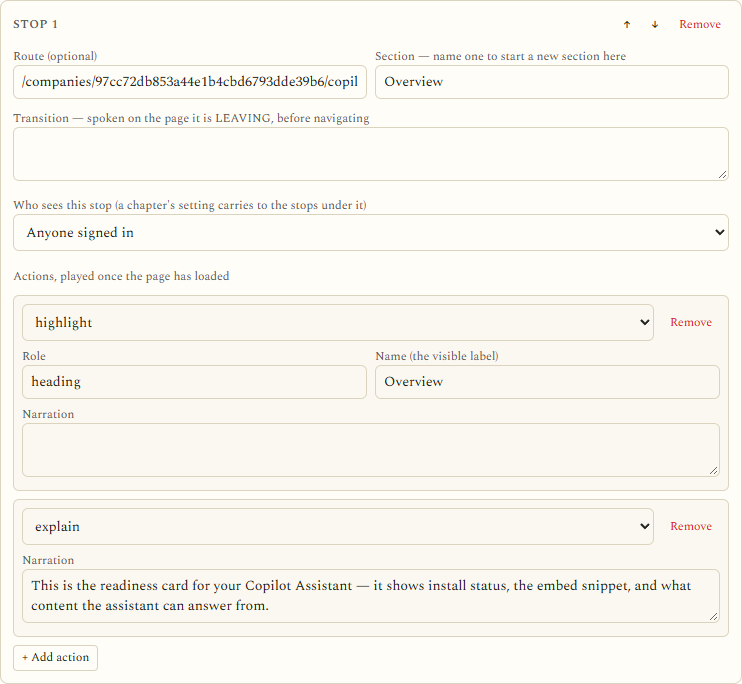
A tour is an ordered list of stops. Each stop can set:
- Route — a page to navigate to first (optional).
- Transition — a line spoken on the previous page, before navigating.
- Section (chapter) — names a new section in the viewer’s jump-to rail.
- Actions — each one an op plus a target (
role+name) and anexplainline of narration.
Targets are always a role and a visible name, never an element reference. If a highlight target can’t be found on the page, the stop degrades to narration only — a renamed control softens a tour, it never breaks it.
Record a take by walking the product or site
In the editor, click ● Record a walk-through for an in-app tour, or ● Record on your site for a website tour (this opens a preview of your own site in a new tab and records there). A floating recording HUD follows you around the app, showing Recording / Paused with Pause/Resume and Stop controls — the take survives full page loads.
Every click is captured in the copilot’s own role+name vocabulary; an element with no accessible name is skipped rather than guessed at. A click that navigates to a new page becomes the route of the next stop.
Press Stop and the recorded steps land back in the editor as stops, ready to review and polish.
Generate or draft with AI
From the library, click ✨ Generate with AI to open the “Generate Tour with AI” dialog: describe the tour you want in a prompt and it lands as a new draft. A website tour needs its site’s knowledge crawled first — without it you’ll see: “Your organization hasn’t added or synced a website yet. Add site knowledge first.”
Inside the editor, Draft and Enhance with AI works on the tour you already have: describe or refine your goal, then click Draft a tour, Write the narration (keeps the stops, writes what each one says), or Enhance this tour (reworks the draft using real page headings, controls, and proof it can find).
The draft profile decides which ops are offered — a website tour is never handed submit. Review every generated stop before you publish; nothing changes for viewers until you save.
Edit stops by form or as JSON
Switch between the Stops form view and the raw JSON view (a Monaco editor). Switching views never transforms the tour — the JSON view is the stops verbatim, so a big reorder or paste is often easier there.
Each stop’s actions use one of: highlight, explain, scroll, click, type, select. highlight, click, type, and select require a target name; scroll can optionally name a heading or control to land on; explain narrates without acting.
Issues found before you can publish are listed under the stops: some are blocking (the Save button stays disabled until they’re fixed), others are non-blocking and say the affected piece “will be dropped”.
A website (embed) tour’s actions may click, type, and select — but never submit, and a destructive target (pay / buy / checkout / delete / cancel) is always blocked, however the tour was authored. An in-app tour additionally lets you target each stop or section by audience — Anyone signed in, System admins, Sales, Org owner/admin/dev, or Org owner/admin only — and set a voice and language per beat.
Set delivery: voice, depth, persona
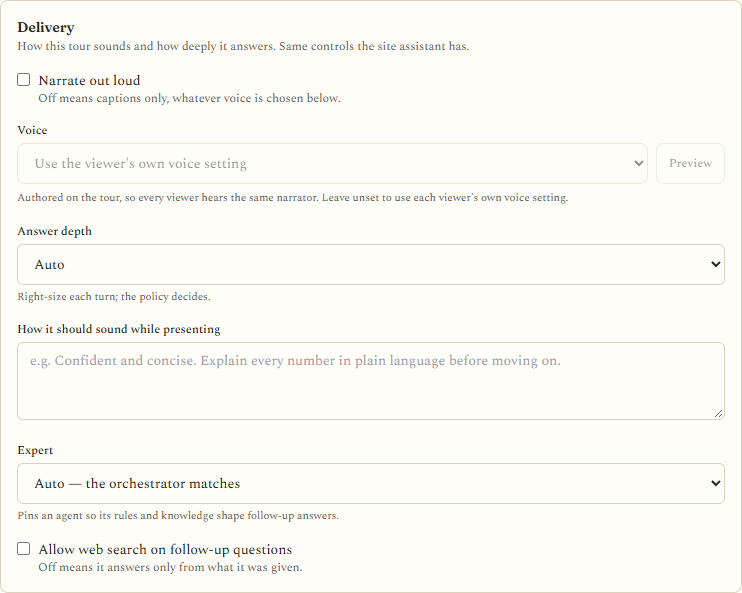
The Delivery section controls how a tour sounds and how deeply it answers — the same controls as the embed’s Appearance page, authored directly on the tour:
- Narrate out loud — off means captions only, whatever voice is chosen below.
- Voice — a picker defaulting to “Use the viewer’s own voice setting”, with a Preview button next to it. Pick one explicitly and every viewer hears the same narrator; leave it unset and each viewer hears their own voice setting instead.
- Answer depth — Auto, Instant, Fast, Balanced, or Deep. Auto right-sizes each turn and lets the policy decide; Deep is slower and reaches for the most capable models available.
- How it should sound while presenting — a persona textarea for the tour’s narration voice (e.g. “Confident and concise. Explain every number in plain language before moving on.”).
- Expert (org tours only) — pin one of your organization’s agents so its rules and knowledge shape follow-up answers, or leave it “Auto — the orchestrator matches”.
- Allow web search on follow-up questions — off means it answers only from what it was given.
None of these settings names a model — the voice id and answer-depth mode are resolved against whatever the pool can actually serve when the tour plays.
Save, publish, set the default
Saving and publishing are separate actions on purpose, so fixing a line of narration can never publish a half-finished tour. Click Save to store your changes.
For a website tour, the Offer this tour to visitors checkbox is its published state — there is no separate status column. For in-app tours, the checkbox reads Published — viewers can start it. Either way, an unsaved toggle is only live once you save.
When an embed has more than one website tour, click Make default to choose which one the widget’s own button plays. Only a published tour can actually serve as the default — an unpublished default falls through to another tour.
For an in-app tour you’re editing, Play it plays it right there, in the current window, without leaving the page.
Preview and play
To try a website tour, open a preview of a page on one of the embed’s allowed domains and press Take the tour in the widget.
To try an in-app tour, type its slash command into the co-pilot — the built-in welcome tour’s command is /demo.
While a tour plays, visitors get Stop, Pause, and Continue controls. Every viewer only ever sees the stops and sections they’re allowed to open — an in-app stop scoped to Sales, for instance, is simply skipped for everyone else.
explain line by hand.